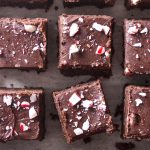
These chocolate peppermint cookies are like a candy cane in cookie form! Rich slice and bake cookies dipped in white or dark chocolate (or both!!) all flavored with just a little peppermint oil are a perfect addition to a holiday cookie tray.
Hello, all!
How is your holiday season going?
Mine is busy, busy like usual. Between my daughter’s birthday (at the beginning of the month) and all the parties, concerts (she plays two instruments and sings), and shopping I barely have time to cook! I know…crazy talk. 🙂
However, it was worth it to go in the kitchen to make a batch of slice and bake cookies and dip them in yummy chocolate and peppermint.
Chocolate Mint Cookies
This recipe starts with my chocolate slice and bake cookies, but don’t worry since I’ve included the recipe here. You have everything you need in this post to make them and dip them. The original post does give more information (discussion, tips, etc.) and has step by step photos, so head over there if you need to.
Those cookies are GREAT just the way they are (though I do like to roll them in sanding sugar or nuts before baking), but it’s nice to make variations and this Christmas-y holiday peppermint flavored version is just perfect!
Crushed candy canes, a little peppermint oil in the chocolate, and super easy melting wafers take this dessert from basic to awesome.

What do you need?
- Chocolate Slice and Bake Cookies – Before you start dipping, you need something to dip. These cookies are made from a basic butter cookie dough with lots of cocoa powder and a couple of egg yolks.
- Melting Wafers – You can use proper chocolate (with cocoa butter) if you wish and are up on tempering, but melting wafers are quick, take out the guess work, and are tasty.
- Peppermint Oil – Since the coating is made with just chocolate you need to be careful how you flavor it or the mixture may seize and get all lumpy. Flavored oils play nice with chocolate and since they are super concentrated you just need a teeny bit.
- Candy Canes – You can use any peppermint flavored candy for the topping. However, small candy canes are very easy to crush into perfect cookie sprinkles.
Tip: I like either Merkens Wafers or Ghirardelli Wafers. Of the two, Ghirardelli is easier to find – I’ve found it (here in the US) at Target, Michaels, and Walmart as well as on Amazon. Just make sure you buy melting wafers for candy making and dipping.

How to make this
To make chocolate dipped cookies, first make chocolate slice and bake cookies. Once they are cool, melt candy wafers and add a small drop of peppermint oil. Then dip them into the melted chocolate and place on a rack to cool and set.
1. Make the Cookies
Your first step is to make the chocolate cookies, since there is nothing to dip without them. 😉 I’ve done an entire post delving into all the details about making them – photos, discussion about blooming cocoa, and tips. Since I don’t want to repeat all that info in two posts, I’m going to send you to the original cookie post to read up if my more abbreviated how-to here is not enough.
To make slice and bake chocolate cookies you are going to mix cocoa powder and espresso powder with melted butter. Let that cool, then cream together the cocoa butter mixture with more butter and sugar. Add egg yolks, vanilla, and then flour until you have a dough.
Shape that dough into a log, wrap it into parchment paper, and chill.
Lastly, slice the dough into 1/4 inch discs and bake for 10 minutes at 375F. You can see the photo of the log and the finished recipe up above.

2. Melt the Chocolate
Once your cookies are made and cool, it’s time to dip them!
To make this easy and straightforward, I use chocolate melts. Melts don’t have cocoa butter in them and that means all you have to do is melt, coat, and let harden and you will have a crisp, shiny coating.
For the melts, I recommend 16-20 ounces total. I used 10 ounces each of white melts and dark melts. (I wouldn’t suggest using less than 8 ounces at a time since a smaller amount will cool too quickly. 8 ounces minimum and you will have time to dip your cookies.)
To melt the chocolate I like the old-fashioned method of using a double boiler. Fill a mid-sized pot with a couple inches of water and put a heat proof bowl over the top, making sure the water doesn’t touch the bowl. Then heat the water to steaming and melt.
Take the chocolate off the heat when it is mostly melted and stir until it’s smooth. Then add the peppermint oil (just a little!) and stir that in.
3. Dip and Decorate
Take each cooled cookie and dip it in the coating however you wish. You can put the whole thing in, dip just the top, dip half and then the other half for a two tone effect. It’s all good!
Tip: For a smoother coating, add ~1 tsp of vegetable oil, coconut oil, or shortening along with the peppermint oil. This is particularly good for when you want to dip the whole cookie in the chocolate.
While the coating is still wet, sprinkle each cookie with crushed candy canes. If you are doing two tone cookies, sprinkle each half as you do it.
Make Ahead/Storage
The chocolate cookies can be baked the day before and kept in a container once they fully cool.
The finished cookies are best eaten in 4-5 days after you make them (and are at their very best in the first 2 days).
These cookies freeze well! Freeze the finished cookies on a flat tray until frozen and then store them in a well sealed container for up to 2 months. Let thaw uncovered on the counter so that they don’t get mushy from condensation.
Why Use Peppermint Oil?
Since this recipe calls for straight melted chocolate (or melts), it can seize if you use a peppermint extract. Chocolate and water do not mix. By using an oil you are keeping the chocolate happy.
Note: You can melt chocolate with water if you use A LOT of it. So chocolate with an equal amount of cream or tablespoons of butter will melt just fine and then you can add extracts too. This recipe doesn’t add any water and needs the oil.

Favorite Christmas Cookies
If you try my recipe for Chocolate Peppermint Dipped Cookies, I would love to hear from you in the comments with your experience and rating! And I’m happy to answer any questions you might have.
– Happy Baking, Annemarie
Chocolate Peppermint Dipped Holiday Cookies
Ingredients
Chocolate Slice and Bake Cookies
- 20 tbsp (2 1/2 sticks, 10 oz) unsalted butter, cool room temperature, divided
- 1/2 cup (2 oz) cocoa powder
- 1 tsp espresso powder
- 1 cup (7 oz) granulated sugar
- 2 egg yolks
- 1 tbsp vanilla extract
- 2 1/4 cup (11 1/4 oz) all-purpose flour
- 1/4 tsp table salt
Chocolate Peppermint Coating
- 8-10 oz dark chocolate flavored melting wafers
- 8-10 oz white vanilla melting wafers
- 2-3 droplets peppermint oil
- 1/4 cup crushed candy canes
Instructions
Chocolate Slice and Bake Cookies
- Bloom the Cocoa Powder: Melt 4 tablespoons of the butter in a medium saucepan. Stir in the cocoa powder and espresso powder to make a smooth paste. Let cool for 15 minutes.
- Cream the Butter and Sugar: In a standing mixer with the flat beater, cream together the remaining butter with the sugar and the butter/cocoa mixture. Mix on high for 3-4 minutes, or until it is light and fluffy.
- Make the Dough: Add the egg yolks and vanilla. Mix on medium until combined. Scrape down the bowl and mix for 1 minute.
- Stir together the flour and salt.
- Set the mixer to low. Add the flour by thirds (1/3 at a time) and mix each addition until just combined, scraping down the bowl of the mixer before adding the next.
- Once you've added all the flour, take the bowl off the mixer and use a spatula to finish mixing and make sure you have a cohesive dough.
- Shape and Chill the Dough: Transfer the dough to a piece of parchment paper and then shape the dough into a rough log, about 12 inches long.
- Wrap the parchment paper around the log so that it wraps around the log and covers it completely with some room on both ends.
- Take the top side of the parchment and tuck it in against the log to make a fold. Use a bench scraper to press along the fold and even out the log of the dough into a smooth cylinder.
- Chill the dough until completely firm, at least 1 hour and up to 3 days. (If you are storing the dough in the refrigerator for more than a few hours, put the dough in a sealed bag.)
- Bake the Cookies: Heat oven to 375F. Line baking trays with parchment paper.
- Slice the cookies 1/4 inch thick. Bake for 10-12 minutes. Then rest the cookies on the tray for 5 minutes before moving them to a cooling rack.
Chocolate Peppermint Coating
- Melt the Chocolate: Fill a medium saucepan with a few inches of water. Add the dark chocolate melting wafers to a bowl large enough to fit over the saucepan but not touch the water.
- Bring the water to a simmer (don't let it boil!) Place the bowl over the saucepan and gently heat the wafers, stirring frequently, until they are nearly melted. Remove the bowl and place on a towel. Stir the chocolate until fully melted. (Alternatively, place it in a microwave safe bowl and microwave for 30 seconds at half power. Stir. If not melted, continue microwaving for 15 second intervals at half power and stirring each time until mostly melted.)
- Add 1-2 droplets of peppermint oil to the chocolate and stir.
- Dip the Cookies: Dip the cookies into the chocolate (dip in half the cookie for two tone cookies or the whole top for single tone). As you finish each one, place on a cooling rack so they can set.
- Sprinkle on some of the crushed candy canes while the coating is still wet.
- Once the chocolate has set and is glossy, repeat the process with the white melts.
Notes
- Chocolate Melting Wafers: Chocolate wafers are sometimes called candy melts. They contain oil in place of the cocoa butter which means they can simply be melted to coat the cookies and will create a hard, glossy coating when set. I used Ghirardelli Wafers in dark and white.
- Using Chocolate with Cocoa Butter: If you don't want to use candy melts, you can use chocolate chips instead. However, note that you will need to keep the cookies in the refrigerator since chocolate loses its hardness and gloss when melted. Or you will need to temper to keep the cookies at room temperature.
- Peppermint Oil: Chocolate (or candy melts) and water do not mix. This means you need to use a peppermint oil and not a peppermint extract. Peppermint oil can be purchased on line or in stores with a cake decorating aisle (such as Michaels). Note that peppermint oil is VERY STRONG. Add it by small drops until you are happy with the flavor.
- Thinning the chocolate: If you want to make sure you have a very smooth coating on the cookies, add 1 teaspoon of canola oil, coconut oil, or shortening to each bowl of melted coating. (I don't recommend butter, since butter contains water and water can seize your chocolate.)
- Cookies Post: While I have included all of the recipe information for the cookies here, you may want to read the full Chocolate Slice and Bake Cookies post with all the tips.


Leave a Reply