No knead bread is the way to go! You don’t need a machine. You don’t need any bread making experience. All you need is a bowl, a spoon, a pot, and plenty of time (it rises while you sleep!) and you too can be eating this yummy rosemary no knead bread tomorrow.

I have been making variations of no knead breads ever since Mark Bittman popularized Jim Lahey’s recipe in 2006.
Okay, not quite from 2006, since I will admit I was skeptical that you could stir some flour with yeast and water, just walk away, and come back to bread. But finally the excitement over this bread was too much for me (maybe about year later?) and I had to try it. One taste and I was a convert. 🙂
You really can walk away from dough and it’ll make bread while you sleep. In fact, I’d say leaving the dough alone and simply being patient might even make better bread than some of the more complicated methods.
It’s not that I’m against kneading. I do find it rather meditative. And there are breads which do require more attention that I’m certainly still going to make. But bread that practically makes itself while I sleep? Sign me up!
And of course, once I started making no knead bread, I needed to try different variations! Different flavors. Different shapes. Different additions.
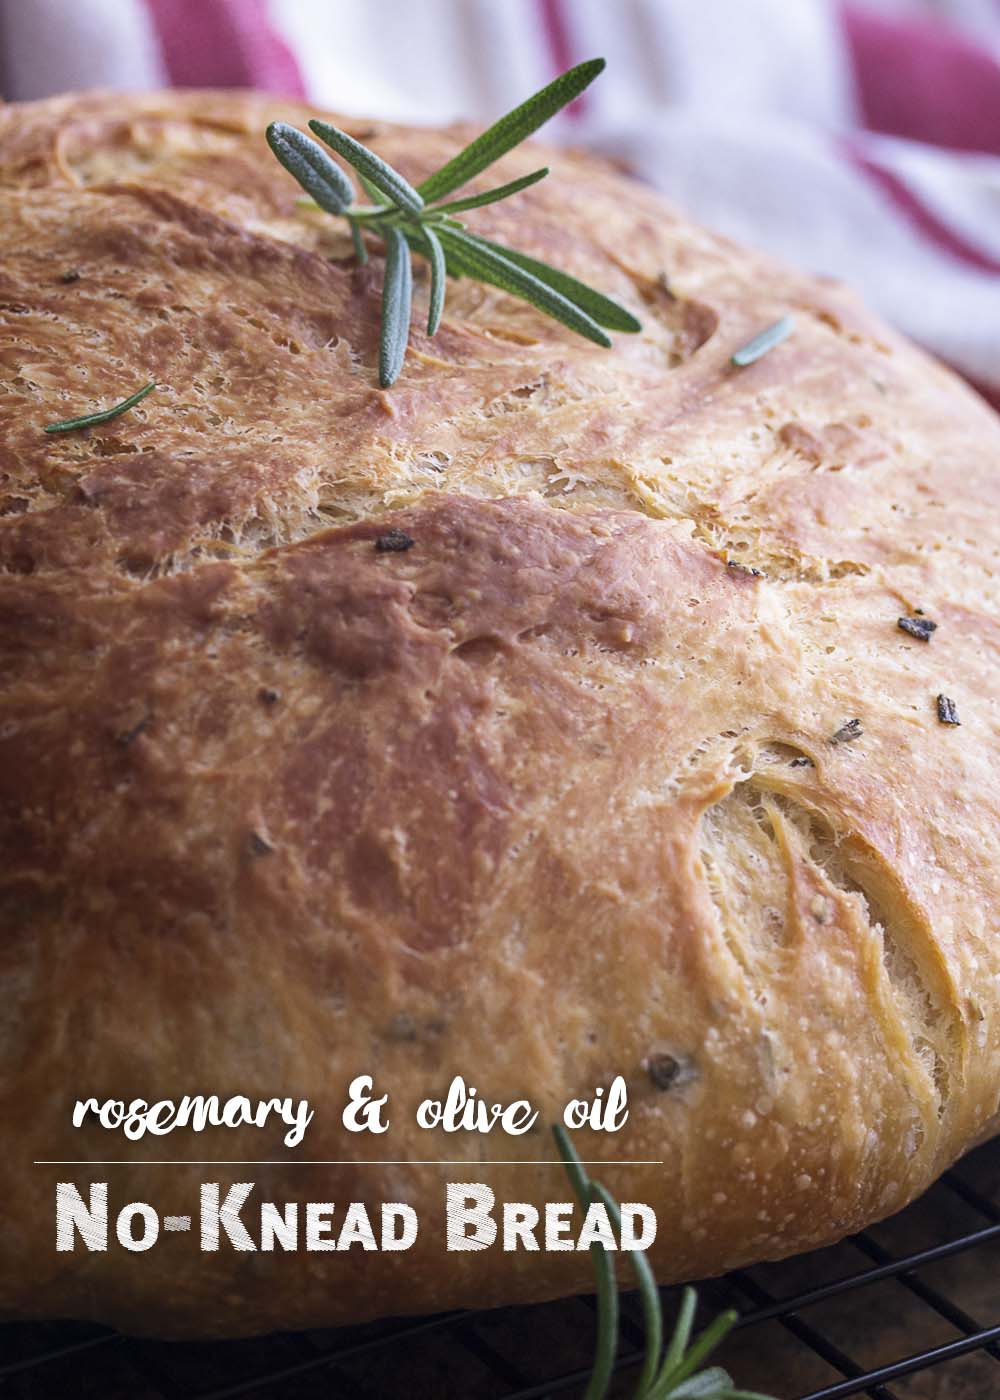
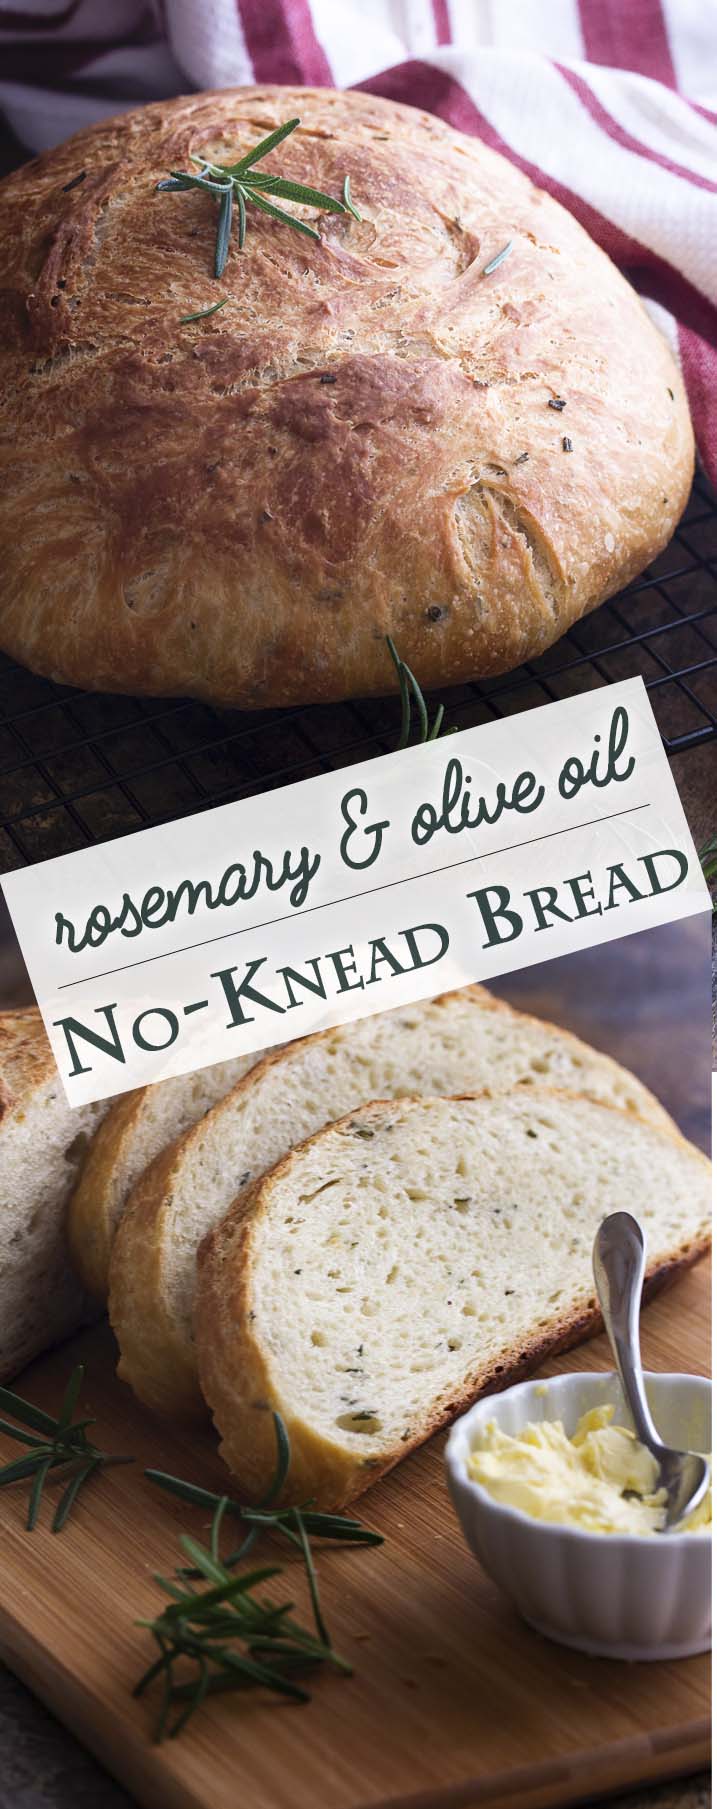
Like this olive oil rosemary no knead bread which is so darn tasty it’s my new favorite version. I even made it for my parents when they visited recently! I was making my lamb and artichoke stew (parent approved and daughter approved – she had two bowlfuls and wanted more) and thought a good, crusty bread was just the thing to serve along side. So, I pulled out my notes and 5 minutes later my dough was hanging out becoming bread.
Oh, and before dinner I made my three cheese broccoli bites. Mom can’t wait to make them herself for her friends. They are seriously tasty and gluten-free! What more could you want?

But back to the bread! It’s:
- easy
- oh so tasty
- much cheaper than store bought
- full of yummy rosemary flavor
- did I mention easy?
- probably better for you than mass produced bread!
- and easy
How do you make rosemary no-knead bread?
To make rosemary no-knead bread, stir together the flour with yeast, rosemary, water, oil, and salt. Cover and let rise overnight and then shape, proof, and bake in a dutch oven until browned and cooked through.
It’s that easy!
If you have a bowl, ingredients, and a spoon you can mix the dough. To finish it, you will need a dutch oven with a lid and parchment paper.
Why parchment paper?
The way the dough works is by adding more water to the flour and letting the yeast do the work to align the gluten. That makes the dough sticky! Parchment paper keeps you from needing to scrape the bread out of the dutch oven at the end.
Why a dutch oven?
This particular style of bread needs a well developed crust.
By using a pot with a lid you are keeping the steam inside the pot and that steam is developing the crust. This recipe will make a great bread without using the dutch oven, but you will not get the same crust that way.

Tips for Making No-Knead Bread
You will need a fairly large oven-safe Dutch oven. You can go cast iron, enameled, stainless. It’s up to you! But you do need a pot with a lid and one that can deal with high oven temperatures.
Depending on your oven, you may need to adjust the temperature. In my oven my bread gets uncomfortably close to burnt at 450F so I use 425F after I’ve fully heated the oven. You want to have a deep brown crust, but not black.
Use fresh rosemary! Dried is just not the same and this is rosemary no knead bread so it should taste of rosemary. Go big or go home. 🙂 I clipped a few tips off of my little rosemary bush, gave them a chop, and tossed them into the flour and it was all good.
I like using an extra virgin olive oil in the bread. You will get a deeper olive flavor with a more intense oil and I like that.
No-Knead Bread Recipes
If you love this bread and want to try some variations on other no-knead breads, I have two great focaccia recipes and one for no-knead dinner rolls (a big hit last Thanksgiving!).
If you try my recipe for Olive Oil and Rosemary No-Knead Bread, I would love to hear from you in the comments with your experience and rating! And I’m happy to answer any questions you might have.
You can connect with me by subscribing to my emails or liking my Facebook or Pinterest (see the form and icons in the sidebar or below the recipe card)
– Happy Baking, Annemarie

Olive Oil and Rosemary No Knead Bread
Ingredients
- 15 oz (3 cups) all-purpose flour
- 1/2 tsp instant yeast
- 1 1/2 tsp table salt
- 2-3 tbsp chopped fresh rosemary
- 1 1/4 cups room temperature water
- 1/4 cup olive oil
Instructions
- In a large bowl combine the flour, yeast, salt, and rosemary. Add the water and olive oil and stir with a large spoon until the flour is completely incorporated. You may need to get your hands in there to finish mixing in the flour. The dough will be wet and sticky. Cover the bowl with plastic wrap and let it sit in a warm spot in the kitchen for 10-12 hours.
- Once the dough is covered in bubbles and looks puffy the dough is ready to be shaped.
- Lightly dust a work surface with flour and sprinkle a little more flour over the top of the dough. Using your fingertips, scrape the dough out of the bowl onto the floured surface. Fold over the dough a few times to give the dough a little structure. Then gather the dough into a ball. Brush a piece of parchment paper with oil. Put the dough onto the parchment and cover it with a damp kitchen towel. Let the dough rest for 1 hour.
- 30 minutes before you are going to bake the bread, put a large (oven safe) pot with a lid into the oven and heat the oven to 500F.
- When you are ready to bake, you can either cut a slit in the top of the bread with a serrated knife or grease another piece of parchment and flip the bread onto the new piece so that the seam side of the bread is facing up. Either will let the bread expand during baking.
- Then pick up the bread by the corners of the parchment and lower it into the large pot. Cover the pot and put it back in the oven. Lower the heat to 425F. Bake the bread for 30 minutes.
- Remove the lid and bake for an additional 15 minutes. Transfer the bread to a rack and let cool.
Notes
- Rosemary: Fresh rosemary is a must for this recipe! Dried just doesn't provide the flavor.
- Slashing the dough: While I have flipped the dough to its seam side, I do prefer to make a cut in the dough. Use a sharp, serrated knife and gentle pressure to saw into the dough.
- Flour/Water Balance: Depending on how you measure your flour and how dry your kitchen is, you may need to a more water to bring the dough the right wet and sticky consistency. If your dough is dry after you mix it, add water by the tablespoon until it feels right.
- Yeast: If you wish to use active dry yeast, mix the yeast with the water and let it rest for 10 minutes to dissolve the yeast before continuing with the recipe.


Regina Marie Pelayo says
Ok, I NEVER review recipes but this is the tastiest, easiest bread I’ve made. I just slather a slice with butter and it’s amazing! I cheated on the proofing, though… I proofed for 2 hours using the proof setting on my quick cooker(instapot) a half hour between foldings, instead of proofing overnight. I just don’t have the patience and it comes out so much lighter and softer.
Like says
Can this be made in a crock pot.
justalittlebitofbacon says
Nope! This must be made in the oven using a large pot.
Chloe says
I have been using this bread recipe for months now and my family absolutely loves it! It’s incredibly easy to make and the fragrances of rosemary and olive oil is a beautiful match. I live in a dry climate so I add more water than the recipe and it always comes out fantastic. Thank you for sharing your bread recipe.
Tara says
Does this recipe take longer than thirty minutes?
justalittlebitofbacon says
Yes? As noted in the recipe card it takes nearly 12 hours.
Rhonda says
Just took this bread out of the oven. Smells so good and the bread is lovely. Cant wait to cut into it.
justalittlebitofbacon says
Oooh! Enjoy!
Ozge says
Omg omg. I ate half of this bread as soon as it came out of the oven. Soooo good. Not good for my bottom but don’t care.
justalittlebitofbacon says
Sometimes we just need some bread no matter what our bottom thinks. 😉
Linda says
Made this and it turned out absolutely delicious. I let it sit a little longer but Wow. This recipe is definitely a keeper.
justalittlebitofbacon says
Wonderful! I’m glad you enjoyed the bread.
Carlie says
How much more additional flour should I be adding to get it into a ball? My dough was very wet and sticky. I could barely get it into a ball shape. Is it supposed to go into the oven like that?
justalittlebitofbacon says
How did you measure the flour? If you did it by cups those can be light or heavy depending how you filled them. That said, if the dough won’t get into a ball, add more a little at a time until it does, though don’t worry if the ball is bit on the flat side since it will still be tasty.
Andrea Lightman says
Thank you! This came out perfectly and I only had a glass dutch oven, but it worked perfectly. Can’t wait to make the next loaf!
justalittlebitofbacon says
Wonderful! I’ve never made it in glass so I’m glad it worked out well for you.
Miriam Rudnick says
Question, when putting the empty pot in the oven, do you put it in the oven before setting it to 500 degrees, or do you preheat the oven to 500 degrees and then put the pot in? I am actually in the process of making this now (and did the latter, but thought I would ask what was intended to be done,) and found that the bread wasn’t at all browned after the 30 minutes of baking after lowering the oven temperature to 425, so I removed the lid and am letting it brown that way for a while. Looking forward to the first taste!
justalittlebitofbacon says
Definitely put the pot in the oven and then start the oven (see step 4). As you now know, the pot needs to be rocket hot to get the right browning. 🙂
Miriam Rudnick says
Thank you very much, I appreciate the clarification and made a note on the recipe printout so I do it correctly next time. I let it brown uncovered in the oven for a while and it still tasted great.
Vidya says
OMG! Thank you so very much for this recipe. I have always been intimidated when thinking of making bread. Every step is so easy and I especially love how you explained step by step. Having it in the Ditch Oven is like getting a little surprise at the end. The smell in the kitchen was amazing. My daughter said it reminded her of Thanksgiving. Only problem – bread didn’t last very long in my house. Making another one this morning. Thank you again.
justalittlebitofbacon says
I’m glad you are enjoying this recipe and that you found my info/tips helpful. And bread doesn’t last very long in this house either!
Kathy Lathrop says
i am making this right now and have a very large Lodge dutch oven, but am wondering if it is too big.. it measures about 10 1/2 inches cross the trop.
justalittlebitofbacon says
That size would be great! The one I use is actually a bit larger.
Kathy Lathrop says
It turned out perfectly and it was delicious! Looking forward to trying it with garlic and thyme. Thank you so much.
Margaret says
Going to try this tomorrow and will prepare dough tonight and allow for first rise overnight. My question is I won’t be able to bake until midday tomorrow so can I put the dough in the fridge after first rise, or should I just leave it out on counter overnight thru midday tomorrow? Indoor temp 70-73 thank you!
justalittlebitofbacon says
Hi! I would look at the dough in the morning and see how far along it is. Let the dough make your decision. So long as it’s pretty well risen, a rest in the fridge will give you some time before baking, but your dough may be feeling slow and need more time on the counter. Look, test it with a finger poke (some spring back with clear indents left), and decide. Good luck!
Corlan says
How long is too long for the first rise? My house is about 68 in the day, goes down to 60 at night. Seems like I should either start it very early or rather late. Suggestions?
justalittlebitofbacon says
The first rise can take a whole day depending on temperature and how much yeast you are using. As for your situation, I would start the first rise in the evening and then move it to a warmer spot in the morning when you can watch it if it’s not done when you get up. (The top of your dryer, under a light, in a warmed oven, etc.) And figure it is going to take at least 12 hours.
corlan says
Thank you. Is there a good way to tell when it’s risen enough? Should I mark a line in the bowl??
justalittlebitofbacon says
If you are using a straight sided container, you can use a line. Otherwise, you can poke your finger into the dough and see if it springs back. What you want is for the dough to spring back a little (maybe half) but have the indentations remain. Here’s a visual.
Corlan says
Thanks so much. I started it at 8 at night, baked at 12:3o the next day and it was perfect.
I actually mixed up the dry ingredients earlier, put the water and oil in a measuring cup and just needed to stir when I was ready.
After the rise, I put the dough into a bowl with parchment paper in it, so I only needed to lift paper when it was time to bake.
Janice Cornejo says
Hello!
I love making no knead bread! Could this recipe be shaped into rustic loaves? With steam in the oven?
Thanks!
justalittlebitofbacon says
You certainly can so long as you do have steam. Just put in a second pan/skillet and let it heat, then add ice cubes to it when you put in the bread. (I talked about this in the comment just below yours.)
Ally says
Soooo college student here stuck at home and boredom baking. I don’t own a pan with an oven-safe lid. Could I do a wider, flatter loaf in a cast iron with foil over top? Or do you have any other suggestions? Thanks 🙂
justalittlebitofbacon says
I have a few suggestions! One, switch to my no knead focaccia which uses cast iron and no lid. Two, if you have an oven safe pot and a baking sheet, use the baking sheet as the lid. Three, heat your cast iron as you would the pot plus heat a small skillet (no glass or ceramic). When you are ready to bake put the bread in the cast iron (no foil) and put some ice cubes (about 10) in the other skillet and that will make the steam you need. One of these should help you be less bored and more full of bread. 🙂
Christina says
So I have just made my second attempt at this bread. The first time it didn’t rise overnight so it was very dense. This time, I did get it to rise in the oven overnight with the light on. But when I scrape it out of the bowl, there’s no shaping it. It’s very gooey and runny. I’ll still let it rise the second time and bake it but I don’t think it will come out right. Any suggestions? I am using fresh yeast.
justalittlebitofbacon says
Hi! It’s a bit late for your last bake, but I do have a couple of thoughts. First, how are you measuring the flour? If you are measuring by cups, you may be a bit light. Dip the cup into the flour and scoop up the flour then sweep off the excess. That will give you 5 oz cups of flour. Second, how cold is your house? If it’s below 68F, it is going to take a fair amount longer than the recipe time for the dough to rise. Third, your yeast is fresh, but if it is an active dry yeast (as apposed to instant), it may benefit from a 10 minute soak in the water with a pinch of sugar. I hope that helps!
Jessica Sandgren says
I am a novice bread baker and this bread is so easy and perfect! It’s crispy on the outside and tender in the middle!
Question- could you adapt this recipe to make different flavors?
justalittlebitofbacon says
Oh, definitely! You can replace some of the flour with rye, or millet, or oats for a whole grain version. You can use other herbs – thyme, sage, basil, etc. You can mix in add-ins of your choice when you are shaping the bread. Like some diced cheese, jalapenos, chopped olives, or walnuts, and so on. You can even make it sweet by adding a few tablespoons of cinnamon sugar and dried fruit or chocolate chips. (Also during the shaping phase.) It really is an extremely versatile loaf.
Teresa says
My house tends to be on the chilly side, especially tonight. If I want this bread for dinner tmw, should the first rise be in my oven with the light on? It gets around 76-80 degrees. Then after 12 hours (in the morning) shape it, then place it in the fridge for a slower 2nd rise until dinner?
justalittlebitofbacon says
That would probably be fine (though the oven may be a titch warm at 76+, so it may take closer to 10 hours). And you can bake it directly from the fridge so long as it has completed its rise. If you are not sure if the center is cooked, bread is done at ~195F when checked with a thermometer.
Sam says
Any adjustments for high altitude?!
justalittlebitofbacon says
Hi, I’m sorry I’ve never been at high altitude so I have no idea how to adjust the recipe. I’m sure someone out there has done it so I would recommend doing a google search.
Kathy says
I live at high alt and it baked perfectly for me.
justalittlebitofbacon says
Awesome! I’m glad to know it works up there as well as down here. 🙂
Kiera says
I’ve made this bread multiple times, with and without the rosemary. Its honestly my favorite bread recipe. Its so simple its hard to go wrong! It is so soft and delicious but you still have a nice crust on the outside.
justalittlebitofbacon says
Great! Thank you for the comment! 🙂
monika says
Amazing! Despite not having much experience baking I was able to pull this off. This recipe is easy to follow and the bread tastes so good. Thank you! Next time, I will try to focaccia.
justalittlebitofbacon says
Yay! I’m glad you gave the recipe a try and had success, Monika!