Find a Recipe!

Just a Little Bit of Bacon

where comfort food meets the farm stand

  • Home
  • Recipes
    • beverages
    • desserts
    • grilling and bbq
    • main courses
    • quick dinners
    • side dishes
    • soups and stews
  • mediterranean recipes
    • italian recipes
      • italian comfort food
      • italian antipasti
      • fundamentals of italian cooking
    • spanish recipes
      • spanish tapas
    • french recipes
      • french comfort food
    • greek recipes
  • holiday favorites
    • christmas
    • easter dinner
    • thanksgiving feast
  • resources
    • dinner and party menus
    • farmers’ market
      • ingredient spotlight
    • roundup post
  • About
    • Privacy Policy
  • Contact

How to Make Homemade Greek Pita Bread

March 9, 2017 By justalittlebitofbacon 6 Comments

Disclosure: This post may contain affiliate links. I receive a small commission at no cost to you when you make a purchase using my link. Click here for details.

Yes, you can buy pita bread at the store, but there is nothing like biting into a piece of homemade Greek pita bread! The kind that is soft and chewy and a little nutty from a dash of whole wheat flour. The only tough part is making sure you get that magical puff in the oven so that your pita bread is a pocket bread. And I have a trick for that!

Homemade Greek Pita Bread isn't hard to make! You simply need a hot oven, fresh yeast, and a few tricks to make yummy pocket bread. | justalittlebitofbacon.com

One thing I love about going to a good, Greek restaurant is when they have homemade Greek pita bread. It’s so soft and yummy and everything a good bread should be. Perfect for filling with some souvlaki or dipping into hummus or just eating by itself.

It always makes picking up pitas from the supermarket a let-down. Supermarket pitas are pita shaped and have a pocket and are improved by a quick saute before serving, but they are designed to have a shelf life. Supermarket pitas are serviceable.

And I don’t want serviceable! I want yummy. I want food the way it is meant to be eaten.

How about you?

I’m figuring if you’re here, you want yummy too. 🙂 So let’s make some pitas.

Homemade Greek Pita Bread isn't hard to make! You simply need a hot oven, fresh yeast, and a few tricks to make yummy pocket bread. | justalittlebitofbacon.com

Before I continue, I want to thank my hand model. My daughter frequently gets me calling her over from her homework in the afternoon to lift up forks and demonstrate how things are done so I can take the pictures. I tried having her take the pictures while I demonstrated, but she’s cuter (yes, even her hands are cuter – don’t fight me on this) and this way I can make sure everything is in focus and set up the way I want.

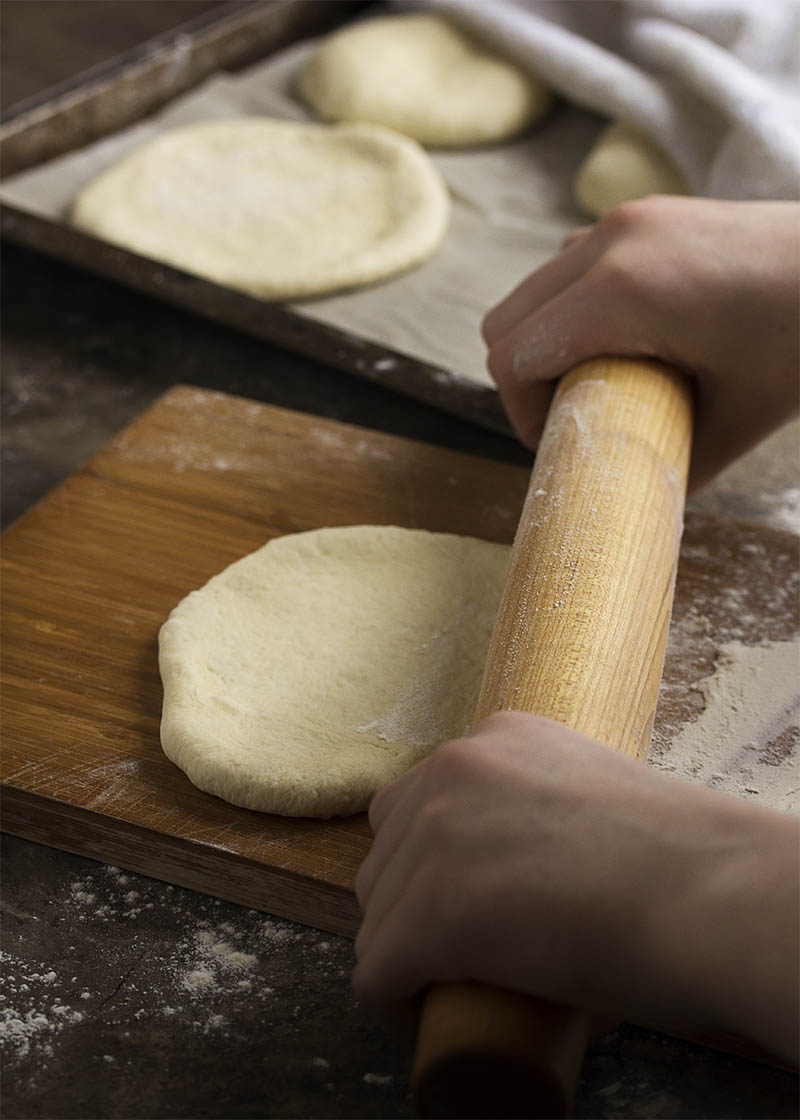
As you can see in these two photos, she is rolling out some of the dough. First, she rolled out a piece to the 4 inch diameter. Then, after the dough rested, I called her back to roll a piece out the final size, which ends up being about 7 inches. I pulled back the cloth for the photos so you could see the round balls of dough, the small disks, and then the large pieces.

Once you have the dough all rolled out to its final size, it’s time to get them in the oven! Which you have totally heated for the past hour. Right? You need that oven good and hot, not just ‘preheated’ where it’s sort of at the temperature.

Yes, of course you did! Because you want those pitas to puff.

But wait, don’t put them in yet. Before you put them down on your baking stone or Lodge Cast Iron Pizza Pan (that’s what I have!), you are going to spray or brush them with water. Just the tops. Keep the bottoms dry since it becomes quite annoying to transfer the pitas if the bottoms are damp, and only the tops need to get wet down.

Why are you doing this? Because you want those pitas to puff. 🙂

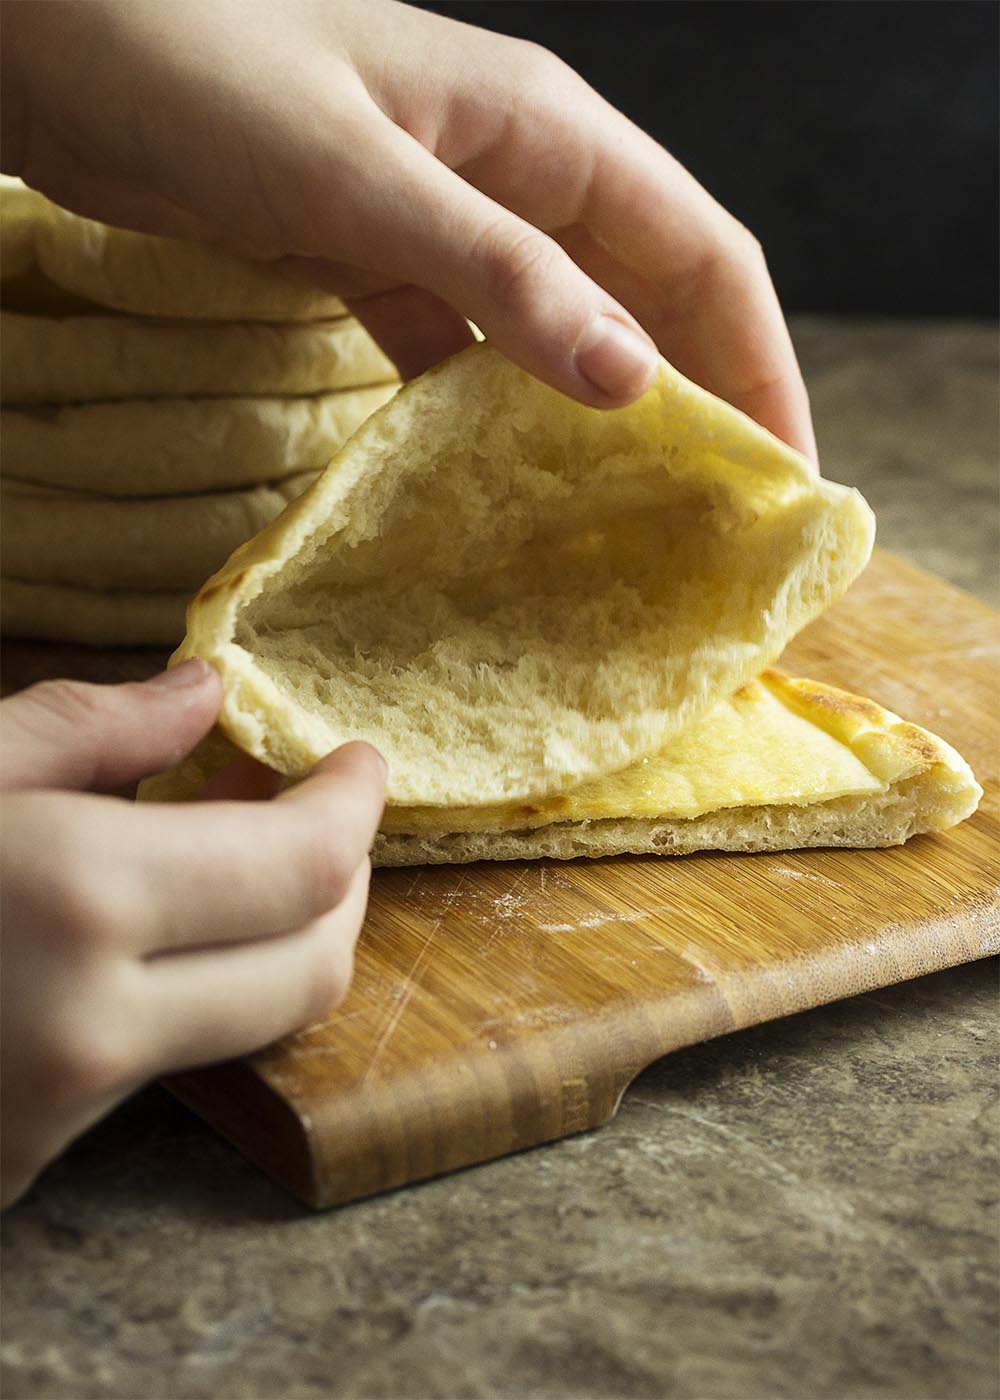
Really. It’s important and useful to wet down the tops before you bake them. If I don’t use water, I get about half of my pitas puffing and making that wonderful pocket we all want. When I use water? Every one. Every pita I’ve made since I tried the water trick has puffed.

Homemade Greek Pita Bread isn't hard to make! You simply need a hot oven, fresh yeast, and a few tricks to make yummy pocket bread. | justalittlebitofbacon.com

Ahhh. Just look at that beautiful pocket!

It’s ready to be filled with all sorts of yummy foods. Maybe a little chopped Greek salad? Or how about some Greek meatballs and rice? Or some thinly sliced grilled butterflied leg of lamb? Whatever you put in it, just know it’s going to taste even better since you are wrapping your dinner around a yummy homemade Greek pita bread.

– Happy Rising and Puffing, Annemarie

Homemade Greek Pita Bread isn't hard to make! You simply need a hot oven, fresh yeast, and a few tricks to make yummy pocket bread. | justalittlebitofbacon.com

Homemade Greek Pita Bread isn't hard to make! You simply need a hot oven, fresh yeast, and a few tricks to make yummy pocket bread.
Print Recipe
5 from 1 vote

How to Make Homemade Greek Pita Bread

Homemade Greek Pita Bread isn't hard to make! You simply need a hot oven, fresh yeast, and a few tricks to make yummy pocket bread.
Prep Time2 hrs
Cook Time3 mins
Total Time2 hrs 3 mins
Course: Side Dish
Cuisine: Greek
Servings: 8 pitas
Calories: 140kcal
Author: Just a Little Bit of Bacon

Ingredients

  • 2 cups (10 oz) all-purpose flour
  • 1/2 cup (2 1/2 oz) whole wheat flour
  • 2 tsp kosher salt
  • 2 tsp instant yeast
  • 1 cup warm water, around 105F
  • 1 tbsp olive oil

Instructions

  • Mixer Method: Add the white flour, wheat flour, kosher salt, and instant yeast to the bowl of a standing mixer. Mix everything together and then add the water and olive oil. With the dough hook, mix on low until the dough begins to come together. Then increase the speed to medium and knead the dough for 8-10 minutes. The dough should be very soft and smooth and just a little tacky to the touch. As you are kneading the dough, look at it and add more flour or water (just a bit at a time!) if the dough looks or feels too dry or too wet.
  • Hand Method: Reserve a few tablespoons of white flour, then combine all the rest of the ingredients in a bowl until you have a shaggy dough. Sprinkle a board with the reserved flour, turn out the dough onto the board, and knead the dough until it is smooth and elastic and a little tacky but not sticky.
  • Shape the dough into a ball and oil it. Place the dough into a lightly oiled mixing bowl. Cover the bowl with plastic wrap, and let the dough rise in a warm place until the dough doubles, about 1 1/2 hours.
  • Meanwhile, about 1 hour before you are going to bake the pitas, begin heating your oven. Adjust an oven shelf to the lowest level and put a heavy baking sheet, cast iron pan, or baking stone on it. Preheat the oven to 475F.
  • Once the dough has doubled, use a bench scraper to divide the dough into 8 equal pieces. Shape each of the pieces into a ball by pulling the dough down and pinching it at the bottom. Cover the dough with a damp cloth at let it rest for 10 minutes.
  • Working with one ball of dough at time (keep the rest covered with the cloth), roll each out into a 4-inch disk. Let the dough rest another 10 minutes to allow the gluten to relax again. Then roll each piece of dough out into a 7-8 inch circle. If it's not working set that piece aside and roll out the rest and then come back to it and give it another roll.
  • When you are ready to bake each pita, turn it over and then brush or spray the pita with water (only the new top side - leave the side which will be on the hot stone/pan dry). Quickly place the pita onto your heated surface and bake it for 2-3 minutes.
  • As your pitas finish baking, transfer them to a plate and cover them with a towel. Let the pitas cool under the towel.
  • Heat a cast iron skillet (or a heavy skillet) over medium-high heat. Lightly oil a pita and brown the pita on both sides. This will take 30 seconds to 1 minute.

Notes

  • You want the oven to be really hot, so give it the full hour of preheating.
  • Rolling and resting and rolling again allows the gluten to relax after you stretch it out.
  • To get a consistent puff and pocket in your pitas, don't skip the water step. Wetting the top surface of the bread before baking it allows the bread to expand and safeguards against the dough drying out.
  • I have a Lodge cast iron pizza pan that I use for rustic breads, pitas and flat breads. It can hold 3-4 pitas at a time.
  • Don't brown the pitas until you are ready to eat them. There is nothing like a freshly warmed and browned pita.
Homemade Greek Pita Bread isn't hard to make! You simply need a hot oven, fresh yeast, and a few tricks to make yummy pocket bread. | justalittlebitofbacon.com

Save

Save

Related Posts:

  • Top Recipes of 2017
    Top Recipes of 2017
  • Chicken Souvlaki Hummus Bowl
    Chicken Souvlaki Hummus Bowl
  • Grilled Skirt Steak Gyros
    Grilled Skirt Steak Gyros
  • Greek Easter Menu from Spanakopita to Baklava
    Greek Easter Menu from Spanakopita to Baklava
  • Grilled Pork Shoulder Souvlaki
    Grilled Pork Shoulder Souvlaki
  • Greek Spicy Feta Dip (Tirokafteri)
    Greek Spicy Feta Dip (Tirokafteri)

Filed Under: 10 ingredients or less, 5 ingredients or less, bread, greek recipes, recipe, side dishes, vegan, vegetarian

« Fabulous Quick Lobster Bisque
Cinnamon Spiced Blood Orange Compote with Mascarpone Mousse »

Follow me on:

  • Facebook
  • Pinterest
  • RSS
  • Tumblr
  • Twitter

Don’t miss a post!

Get new recipes in your inbox every week!

Disclosure:

Justalittlebitofbacon is a participant in the Amazon Services LLC Associates Program, an affiliate advertising program designed to provide a means for sites to earn advertising fees by advertising and linking to amazon.com.

Comments

  1. Hilda Sterner says

    December 28, 2017 at 3:02 pm

    This recipe is a little different than my recipe, but I like the idea of wetting the tops of the pita to make them puff. I usually don’t have an issue with them not puffing up, but my sister was recently complaining that about half of her pitas didn’t puff up. I will pass that trick on to her as well. Thanks!

    Reply
    • justalittlebitofbacon says

      December 29, 2017 at 9:02 am

      It’s that little extra insurance. Since I don’t make pitas too often, it really made a difference for me and I hope it does for your sister as well!

      Reply
  2. Chloe says

    September 3, 2017 at 4:02 pm

    5 stars
    Made these, they were absolutely deliciois and VERY soft and they ALL puffed! Fav recipe for pitas!!

    Reply
    • justalittlebitofbacon says

      September 4, 2017 at 12:50 pm

      Thanks for the feedback, Chloe. And I’m glad you love them as much as I do! 🙂

      Reply
  3. Julia @ HappyFoods Tube says

    March 16, 2017 at 4:05 pm

    Oh my goodness! they look perfect! Today I was in the shop standing in from of the pita bread section and thinking that I have to make them myself as they are not cheap at all! So thank you for this recipe, will definitely try it!

    Reply
    • justalittlebitofbacon says

      April 13, 2017 at 2:29 pm

      Thank you, Julia! And homemade tastes so much better too. 🙂

      Reply

Leave a Reply Cancel reply

Your email address will not be published. Required fields are marked *

Recipe Rating


This site uses Akismet to reduce spam. Learn how your comment data is processed.

Hello, I’m Annemarie

Welcome to my kitchen! I’m a Italian-American girl who loves fresh foods, local ingredients, and all sorts of comfort foods. Here you will find Mediterranean flavors and recipes from a New England perspective.

Don’t miss a post!

Sign up here to have new recipes delivered to your inbox every week.

Follow me on:

  • Facebook
  • Pinterest
  • RSS
  • Twitter

Summer Love

Learn how to make homemade orange raspberry frozen yogurt. It is tart and sweet and simple to make! You'll love churning up this cold summertime treat anytime you have craving. | justalittlebitofbacon.com #icecream #frozenyogurt #summerrecipes #dessertrecipes #raspberries #yogurt

Raspberry Frozen Yogurt

Lamb rib chops are coated with a thyme, rosemary, and garlic marinade then grilled to medium rare and topped with a cherry port sauce in this elegant summer dinner.

Grilled Lamb Chops with a Fresh Cherry Port Sauce

Have some overripe peaches on the counter? Puree them up into an intensely peachy and not too sweet fresh peach margarita on the rocks! | justalittlebitofbacon.com

Fresh Peach Margarita on the Rocks

Make your own shawarma wraps! My recipe for homemade grilled chicken shawarma features an intensely flavorful Mediterranean marinade, quick pickled cucumbers, and a tasty yogurt garlic sauce you'll want to put on everything.

Homemade Grilled Chicken Shawarma

In this Greek dinner specialty, thinly sliced pork shoulder is marinated and then threaded into kebabs to make juicy and flavorful grilled pork souvlaki! Make a plate with rice and salad or wrap up the pork in a pita for gyros. | justalittlebitofbacon.com #greekrecipes #grillrecipes #kebabs #porkrecipes #grilledpork #dinnerrecipes

Grilled Pork Shoulder Souvlaki

Ripe sliced plums, crisp grapes, and toasted walnuts are wrapped in a simple, flaky pie crust and brushed with honey in this rustic French plum galette tart.

Plum Galette with Grapes and Walnuts

Reader Favorites

Pan Fried Spanish Cauliflower Tapas - These breaded fried cauliflower bites are a simple and tasty tapas dish you should make at your next get-together! Just a quick dunking in egg and breadcrumbs and a minute in a skillet and you are all done. Can be made ahead and reheated! | justalittlebitofbacon.com

Pan Fried Spanish Cauliflower Tapas

Rich & Complex Traditional Bolognese Sauce - A long, slow simmer builds layers of flavor and makes this Bolognese sauce so rich and complex! Meaty, silky, and hearty. This is a sauce worth having on your stove all day long. Make some for today and freeze some for tomorrow. | justalittlebitofbacon.com

Rich & Complex Traditional Bolognese Sauce

Italian comfort food of tomato, braised sausage, and pork shoulder ragu simmering on the stove is the perfect way to spend a chilly day. This pork ragu is easily doubled and freezes well. | justalittlebitofbacon.com

Italian Braised Pork Shoulder Ragu

Authentic Italian marinara sauce is cooked low and slow to create a thick and flavorful sauce made in the manner of my family tradition. | justalittlebitofbacon.com

Authentic Homemade Italian Marinara Sauce

Zucchini cheddar biscuits are soft, tender and full of shredded zucchini and sharp cheddar. Just drop them onto the baking tray and go. | justalittlebitofbacon.com

Soft and Tender Zucchini Cheddar Biscuits

Thick cut cod is pan seared in a mixture of olive oil and butter to produce a golden brown crust and then served with a lemon, parsley, and caper sauce to make a simple and healthy weeknight meal.

Pan Seared Cod with a Caper, Parsley and Lemon Sauce

Copyright © 2022 — Just a Little Bit of Bacon • All rights reserved. Privacy Policy • Disclaimer

Genesis Framework • Foodie Pro Theme • by Shay Bocks